上一个教程: PyTorch 分类模型的转换以及使用 OpenCV Python 启动
| |
| 原始作者 | Anastasia Murzova |
| 兼容性 | OpenCV >= 4.5 |
目标
在本教程中,您将学习如何
- 将 PyTorch 分类模型转换为 ONNX 格式
- 使用 OpenCV C/C++ API 运行转换后的 PyTorch 模型
- 提供模型推理
我们将通过 ResNet-50 架构的示例来探讨上述要点。
简介
让我们简要地了解一下 PyTorch 模型与 OpenCV API 转换流程中涉及的关键概念。将 PyTorch 模型转换为 cv::dnn::Net 的初始步骤是将模型传输到 ONNX 格式。ONNX 旨在实现各种框架之间神经网络的互换性。PyTorch 中有一个内置函数用于 ONNX 转换:torch.onnx.export。此外,获得的 .onnx 模型被传递到 cv::dnn::readNetFromONNX 或 cv::dnn::readNet。
要求
为了能够试验以下代码,您需要安装一组库。我们将为此使用带有 python3.7+ 的虚拟环境
virtualenv -p /usr/bin/python3.7 <env_dir_path>
source <env_dir_path>/bin/activate
对于从源代码构建 OpenCV-Python,请按照 OpenCV 简介 中的相应说明进行操作。
在开始安装库之前,您可以自定义 requirements.txt,排除或包含(例如,opencv-python)一些依赖项。以下行启动将需求安装到先前激活的虚拟环境中
pip install -r requirements.txt
实践
在本部分中,我们将介绍以下几点
- 创建分类模型转换管道
- 提供推理,处理预测结果
模型转换管道
本小节中的代码位于 samples/dnn/dnn_model_runner 模块中,可以使用以下行执行
python -m dnn_model_runner.dnn_conversion.pytorch.classification.py_to_py_resnet50_onnx
以下代码包含以下列出步骤的描述
- 实例化 PyTorch 模型
- 将 PyTorch 模型转换为
.onnx
original_model = models.resnet50(pretrained=True)
full_model_path = get_pytorch_onnx_model(original_model)
print("PyTorch ResNet-50 模型已成功转换:", full_model_path)
get_pytorch_onnx_model(original_model) 函数基于 torch.onnx.export(...) 调用
onnx_model_path = "models"
onnx_model_name = "resnet50.onnx"
os.makedirs(onnx_model_path, exist_ok=True)
full_model_path = os.path.join(onnx_model_path, onnx_model_name)
generated_input = Variable(
torch.randn(1, 3, 224, 224)
)
torch.onnx.export(
original_model,
generated_input,
full_model_path,
verbose=True,
input_names=["input"],
output_names=["output"],
opset_version=11
)
成功执行上述代码后,我们将获得以下输出
PyTorch ResNet-50 模型已成功转换:models/resnet50.onnx
dnn/samples 模块中提出的 dnn_model_runner 允许我们重现以下 PyTorch 分类模型的上述转换步骤
- alexnet
- vgg11
- vgg13
- vgg16
- vgg19
- resnet18
- resnet34
- resnet50
- resnet101
- resnet152
- squeezenet1_0
- squeezenet1_1
- resnext50_32x4d
- resnext101_32x8d
- wide_resnet50_2
- wide_resnet101_2
要获得转换后的模型,应执行以下行
python -m dnn_model_runner.dnn_conversion.pytorch.classification.py_to_py_cls --model_name <pytorch_cls_model_name> --evaluate False
对于 ResNet-50 情况,应运行以下行
python -m dnn_model_runner.dnn_conversion.pytorch.classification.py_to_py_cls --model_name resnet50 --evaluate False
转换后的模型存储的默认根目录在模块 CommonConfig 中定义
@dataclass
class CommonConfig
output_data_root_dir: str = "dnn_model_runner/dnn_conversion"
因此,转换后的 ResNet-50 将保存在 dnn_model_runner/dnn_conversion/models 中。
推理管道
现在我们可以使用 models/resnet50.onnx 来进行使用 OpenCV C/C++ API 的推理管道。实现的管道可以在 samples/dnn/classification.cpp 中找到。构建示例后(BUILD_EXAMPLES 标志值应为 ON),将提供相应的 example_dnn_classification 可执行文件。
为了提供模型推理,我们将使用以下 松鼠照片(在 CC0 许可下),对应于 ImageNet 类 ID 335
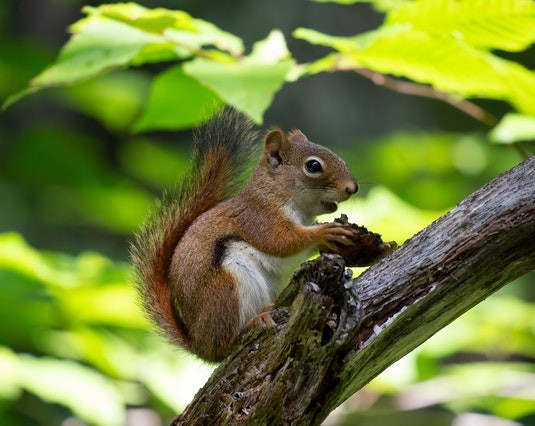
分类模型输入图像
对于获得的预测的标签解码,我们还需要 imagenet_classes.txt 文件,其中包含 ImageNet 类的完整列表。
在本教程中,我们将从构建(samples/build)目录运行转换后的 PyTorch ResNet-50 模型的推理过程
./dnn/example_dnn_classification --model=../dnn/models/resnet50.onnx --input=../data/squirrel_cls.jpg --width=224 --height=224 --rgb=true --scale="0.003921569" --mean="123.675 116.28 103.53" --std="0.229 0.224 0.225" --crop=true --initial_width=256 --initial_height=256 --classes=../data/dnn/classification_classes_ILSVRC2012.txt
让我们逐步探索 classification.cpp 的关键点
- 使用 cv::dnn::readNet 读取模型,初始化网络
Net net = readNet(model, config, framework);
model 参数值取自 --model 键。在我们的例子中,它是 resnet50.onnx。
if (rszWidth != 0 && rszHeight != 0)
{
resize(frame, frame, Size(rszWidth, rszHeight));
}
blobFromImage(frame, blob, scale, Size(inpWidth, inpHeight), mean, swapRB, crop);
if (
std.val[0] != 0.0 &&
std.val[1] != 0.0 &&
std.val[2] != 0.0)
{
}
在此步骤中,我们使用 cv::dnn::blobFromImage 函数来准备模型输入。 我们设置 Size(rszWidth, rszHeight),并使用 --initial_width=256 --initial_height=256 进行初始图像大小调整,如 PyTorch ResNet 推理管道 中所述。
应该注意的是,首先在 cv::dnn::blobFromImage 中减去平均值,然后仅将像素值乘以比例。 因此,我们使用 --mean="123.675 116.28 103.53",这相当于 [0.485, 0.456, 0.406] 乘以 255.0,以重现 PyTorch 分类模型的原始图像预处理顺序
img /= 255.0
img -= [0.485, 0.456, 0.406]
img /= [0.229, 0.224, 0.225]
net.setInput(blob);
Mat prob = net.forward();
Point classIdPoint;
double confidence;
minMaxLoc(prob.reshape(1, 1), 0, &confidence, 0, &classIdPoint);
int classId = classIdPoint.x;
这里我们选择最有可能的物体类别。 在我们的例子中,classId 结果为 335 - 狐松鼠,东部狐松鼠,Sciurus niger

ResNet50 OpenCV C++ 推理输出