上一个教程: 轮廓属性
下一个教程: 轮廓层级
目标
在本章中,我们将学习
- 凸缺陷以及如何找到它们。
- 找到点到多边形的最短距离
- 匹配不同的形状
理论和代码
1. 凸缺陷
在关于轮廓的第二章中,我们了解了什么是凸包。物体与该凸包的任何偏差都可以被认为是凸缺陷。
OpenCV 提供了一个现成的函数来查找它,cv.convexityDefects()。一个基本的函数调用如下所示
void convexHull(InputArray points, OutputArray hull, bool clockwise=false, bool returnPoints=true)
Finds the convex hull of a point set.
void convexityDefects(InputArray contour, InputArray convexhull, OutputArray convexityDefects)
Finds the convexity defects of a contour.
- 注意
- 请记住,为了找到凸缺陷,我们在查找凸包时必须传递 returnPoints = False。
它返回一个数组,其中每行包含以下值 - [ 起始点,结束点,最远点,到最远点的近似距离 ]。我们可以使用图像来可视化它。我们画一条连接起始点和结束点的线,然后在最远点画一个圆。请记住,返回的前三个值是 cnt 的索引。所以我们必须从 cnt 中取出这些值。
import cv2 as cv
import numpy as np
assert img is not None, "无法读取文件,请检查 os.path.exists()"
cnt = contours[0]
for i in range(defects.shape[0])
s,e,f,d = defects[i,0]
start = tuple(cnt[s][0])
end = tuple(cnt[e][0])
far = tuple(cnt[f][0])
void imshow(const String &winname, InputArray mat)
在指定窗口中显示图像。
int waitKey(int delay=0)
等待按键按下。
void destroyAllWindows()
销毁所有HighGUI窗口。
CV_EXPORTS_W Mat imread(const String &filename, int flags=IMREAD_COLOR_BGR)
从文件加载图像。
void cvtColor(InputArray src, OutputArray dst, int code, int dstCn=0, AlgorithmHint hint=cv::ALGO_HINT_DEFAULT)
将图像从一个颜色空间转换为另一个颜色空间。
void line(InputOutputArray img, Point pt1, Point pt2, const Scalar &color, int thickness=1, int lineType=LINE_8, int shift=0)
绘制连接两点的线段。
void circle(InputOutputArray img, Point center, int radius, const Scalar &color, int thickness=1, int lineType=LINE_8, int shift=0)
Draws a circle.
double threshold(InputArray src, OutputArray dst, double thresh, double maxval, int type)
对每个数组元素应用固定级别的阈值。
void findContours(InputArray image, OutputArrayOfArrays contours, OutputArray hierarchy, int mode, int method, Point offset=Point())
在二值图像中查找轮廓。
并查看结果
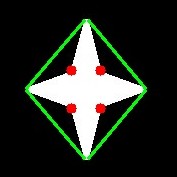
image
2. 点多边形测试
此函数查找图像中的点和轮廓之间的最短距离。它返回距离,当点在轮廓外部时为负,当点在轮廓内部时为正,如果点在轮廓上则为零。
例如,我们可以按如下方式检查点 (50,50)
double pointPolygonTest(InputArray contour, Point2f pt, bool measureDist)
执行点在轮廓内的测试。
在该函数中,第三个参数是 measureDist。如果为 True,则查找带符号的距离。如果为 False,则查找点是在轮廓内部、外部还是在轮廓上(它分别返回 +1、-1、0)。
- 注意
- 如果您不想查找距离,请确保第三个参数为 False,因为这是一个耗时的过程。因此,将其设置为 False 可以提高大约 2-3 倍的速度。
3. 匹配形状
OpenCV 提供了一个函数 cv.matchShapes(),它使我们能够比较两个形状或两个轮廓,并返回一个显示相似性的度量。结果越低,匹配越好。它是基于 hu 矩值计算的。不同的测量方法在文档中进行了解释。
import cv2 as cv
import numpy as np
img1 =
cv.imread(
'star.jpg', cv.IMREAD_GRAYSCALE)
img2 =
cv.imread(
'star2.jpg', cv.IMREAD_GRAYSCALE)
assert img1 is not None, "无法读取文件,请检查 os.path.exists()"
assert img2 is not None, "无法读取文件,请检查 os.path.exists()"
cnt1 = contours[0]
cnt2 = contours[0]
print( ret )
double matchShapes(InputArray contour1, InputArray contour2, int method, double parameter)
比较两个形状。
我尝试将形状与下面给出的不同形状进行匹配
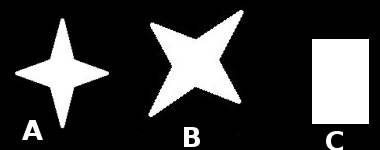
image
我得到以下结果
- 将图像 A 与自身匹配 = 0.0
- 将图像 A 与图像 B 匹配 = 0.001946
- 将图像 A 与图像 C 匹配 = 0.326911
看,即使图像旋转也不会对此比较产生太大影响。
- 注意
- Hu-Moments 是七个对平移、旋转和缩放不变的矩。第七个是倾斜不变的。可以使用 cv.HuMoments() 函数找到这些值。
练习
- 查看 cv.pointPolygonTest() 的文档,您可以在红色和蓝色中找到一张不错的图像。它表示所有像素到其上的白色曲线的距离。曲线内的所有像素都根据距离显示为蓝色。类似地,外部点显示为红色。轮廓边缘用白色标记。所以问题很简单。编写代码来创建距离的这种表示形式。
- 使用 cv.matchShapes() 比较数字或字母的图像。(这将是朝着 OCR 迈出的简单一步)