|
OpenCV 4.12.0
开源计算机视觉
|
加载中...
搜索中...
无匹配项
|
OpenCV 4.12.0
开源计算机视觉
|
OpenCV 提供了两个变换函数,cv.warpAffine 和 cv.warpPerspective,你可以用它们执行各种变换。cv.warpAffine 接收一个 2x3 的变换矩阵,而 cv.warpPerspective 接收一个 3x3 的变换矩阵作为输入。
缩放只是调整图像大小。OpenCV 提供了一个函数 cv.resize() 用于此目的。图像的大小可以手动指定,也可以指定缩放因子。使用了不同的插值方法。首选的插值方法是 cv.INTER_AREA 用于缩小,cv.INTER_CUBIC (慢) & cv.INTER_LINEAR 用于放大。默认情况下,插值方法 cv.INTER_LINEAR 用于所有调整大小的目的。您可以使用以下方法之一调整输入图像的大小
平移是物体位置的移动。如果你知道在 (x,y) 方向上的位移,并假设它是 \((t_x,t_y)\),你可以创建如下变换矩阵 \(\textbf{M}\)
\[M = \begin{bmatrix} 1 & 0 & t_x \\ 0 & 1 & t_y \end{bmatrix}\]
你可以把它变成一个 np.float32 类型的 Numpy 数组,然后把它传递到 cv.warpAffine() 函数中。在下面的例子中,你可以看到一个 (100,50) 的位移。
警告
cv.warpAffine() 函数的第三个参数是输出图像的大小,它的形式应该是 (宽度, 高度)。记住宽度 = 列数,高度 = 行数。
请参阅下面的结果
图像旋转一个角度 \(\theta\) 可以通过以下形式的变换矩阵实现
\[M = \begin{bmatrix} cos\theta & -sin\theta \\ sin\theta & cos\theta \end{bmatrix}\]
但是 OpenCV 提供了可调整旋转中心的缩放旋转,以便你可以在你喜欢的任何位置旋转。修改后的变换矩阵由下式给出
\[\begin{bmatrix} \alpha & \beta & (1- \alpha ) \cdot center.x - \beta \cdot center.y \\ - \beta & \alpha & \beta \cdot center.x + (1- \alpha ) \cdot center.y \end{bmatrix}\]
其中
\[\begin{array}{l} \alpha = scale \cdot \cos \theta , \\ \beta = scale \cdot \sin \theta \end{array}\]
为了找到这个变换矩阵,OpenCV 提供了一个函数 cv.getRotationMatrix2D。查看下面的例子,它在没有缩放的情况下,将图像围绕中心旋转了 90 度。
查看结果

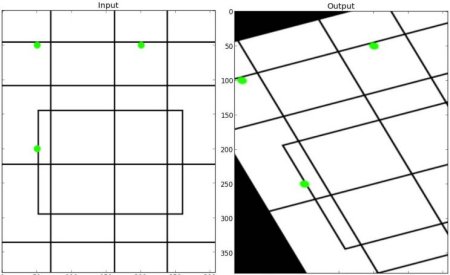
在仿射变换中,原始图像中的所有平行线在输出图像中仍然是平行的。为了找到变换矩阵,我们需要输入图像中的三个点以及它们在输出图像中的对应位置。然后 cv.getAffineTransform 将创建一个 2x3 的矩阵,该矩阵将被传递给 cv.warpAffine。
查看下面的例子,并查看我选择的点(在绿色中标记)
查看结果
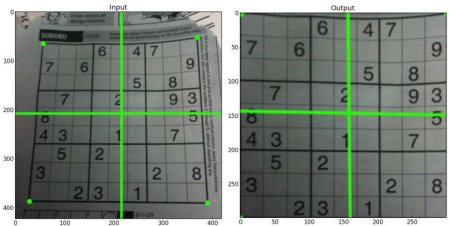
对于透视变换,你需要一个 3x3 的变换矩阵。直线即使在变换后也会保持直线。为了找到这个变换矩阵,你需要输入图像上的 4 个点和输出图像上的对应点。在这 4 个点中,其中 3 个不应共线。然后可以通过函数 cv.getPerspectiveTransform 找到变换矩阵。然后使用这个 3x3 变换矩阵应用 cv.warpPerspective。
见下面的代码
结果