OpenCV 4.12.0
开源计算机视觉
加载中...
搜索中...
无匹配项
带纹理对象的实时姿势估计

上一个教程: OpenCV 相机标定
下一个教程: 交互式相机标定应用程序

原始作者Edgar Riba
兼容性OpenCV >= 3.0

如今,增强现实是计算机视觉和机器人领域最热门的研究课题之一。增强现实中最基本的问题是,在计算机视觉领域,估计相机相对于对象的姿态以进行后续的3D渲染;在机器人领域,获取对象的姿态以进行抓取和操作。然而,这并非一个微不足道的问题,因为图像处理中最常见的问题是应用大量算法或数学运算来解决对人类而言基本且直观的问题时所产生的计算成本。

目标

本教程解释了如何构建一个实时应用程序,以根据2D图像及其3D纹理模型,估算相机姿态,从而跟踪具有六个自由度的纹理对象。

该应用程序将包含以下部分

  • 读取3D纹理对象模型和对象网格。
  • 从相机或视频获取输入。
  • 从场景中提取ORB特征和描述符。
  • 使用Flann匹配器将场景描述符与模型描述符进行匹配。
  • 使用PnP + Ransac进行姿态估计。
  • 线性卡尔曼滤波(Kalman Filter)用于不良姿态的剔除。

理论

在计算机视觉中,从 *n* 个3D到2D点对应关系估计相机姿态是一个基本且已被充分理解的问题。该问题最普遍的版本需要估计姿态的六个自由度和五个标定参数:焦距、主点、纵横比和倾斜。使用众所周知的直接线性变换(DLT)算法,至少需要6个对应关系才能建立。然而,该问题有几种简化方法,这导致了大量不同的算法,这些算法提高了DLT的准确性。

最常见的简化是假设已知标定参数,这就是所谓的透视-*n*-点(Perspective-*n*-Point)问题。

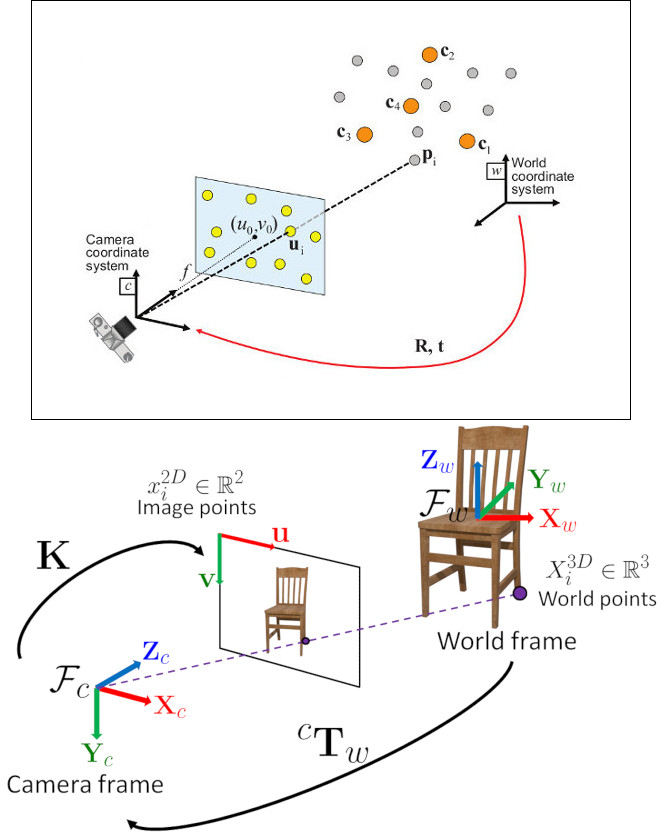
问题表述: 给定一组在世界参考系中表示的3D点 \(p_i\) 及其在图像上的2D投影 \(u_i\) 之间的对应关系,我们旨在检索相机相对于世界的姿态( \(R\) 和 \(t\))以及焦距 \(f\)。

OpenCV提供了四种不同的方法来解决透视-*n*-点问题,这些方法返回 \(R\) 和 \(t\)。然后,使用以下公式可以将3D点投影到图像平面上。

\[s\ \left [ \begin{matrix} u \\ v \\ 1 \end{matrix} \right ] = \left [ \begin{matrix} f_x & 0 & c_x \\ 0 & f_y & c_y \\ 0 & 0 & 1 \end{matrix} \right ] \left [ \begin{matrix} r_{11} & r_{12} & r_{13} & t_1 \\ r_{21} & r_{22} & r_{23} & t_2 \\ r_{31} & r_{32} & r_{33} & t_3 \end{matrix} \right ] \left [ \begin{matrix} X \\ Y \\ Z\\ 1 \end{matrix} \right ]\]

关于如何使用这些方程的完整文档可以在相机标定与3D重建中找到。

源代码

您可以在OpenCV源代码库的`samples/cpp/tutorial_code/calib3d/real_time_pose_estimation/`文件夹中找到本教程的源代码。

本教程包含两个主要程序

  1. 模型注册

    此应用程序适用于没有待检测对象3D纹理模型的用户。您可以使用此程序创建自己的纹理3D模型。此程序仅适用于平面对象,因此如果您想建模一个复杂形状的对象,则应使用更复杂的软件来创建。

    该应用程序需要一个待注册对象的输入图像及其3D网格。我们还必须提供拍摄输入图像的相机的内参。所有文件都需要使用绝对路径或从应用程序工作目录的相对路径指定。如果没有指定文件,程序将尝试打开提供的默认参数。

    应用程序启动时会从输入图像中提取ORB特征和描述符,然后使用网格以及Möller–Trumbore 交点算法来计算找到的特征的3D坐标。最后,3D点和描述符以YAML格式的文件存储在不同的列表中,其中每行都是一个不同的点。关于如何存储文件的技术背景可以在使用XML / YAML / JSON文件进行文件输入和输出教程中找到。

  1. 模型检测

    此应用程序的目的是实时估计给定3D纹理对象的姿态。

    应用程序启动时会加载与模型注册程序中解释的相同结构的YAML文件格式的3D纹理模型。从场景中检测并提取ORB特征和描述符。然后,使用cv::FlannBasedMatchercv::flann::GenericIndex进行场景描述符与模型描述符之间的匹配。使用找到的匹配项以及cv::solvePnPRansac函数计算相机的Rt。最后,应用卡尔曼滤波(KalmanFilter)来剔除不良姿态。

    如果您编译OpenCV时包含了示例,您可以在`opencv/build/bin/cpp-tutorial-pnp_detection`中找到它。然后您可以运行该应用程序并更改一些参数

    该程序演示了如何根据对象的3D纹理模型检测对象。您可以选择使用录制的视频或网络摄像头。
    用法
    ./cpp-tutorial-pnp_detection -help
    按键
    'esc' - 退出。
    ----------------------------------------------------------------------------
    用法: cpp-tutorial-pnp_detection [params]
    -c, --confidence (值:0.95)
    RANSAC置信度
    -e, --error (值:2.0)
    RANSAC重投影误差
    -f, --fast (值:true)
    使用鲁棒快速匹配
    -h, --help (值:true)
    打印此消息
    --in, --inliers (值:30)
    卡尔曼更新的最小内点数
    --it, --iterations (值:500)
    RANSAC最大迭代次数
    -k, --keypoints (值:2000)
    要检测的关键点数量
    --mesh
    ply网格路径
    --method, --pnp (值:0)
    PnP方法: (0) 迭代法 (ITERATIVE) - (1) EPNP - (2) P3P - (3) DLS
    --model
    yml模型路径
    -r, --ratio (值:0.7)
    比率测试阈值
    -v, --video
    录制视频路径

    例如,您可以运行应用程序并更改PnP方法

    ./cpp-tutorial-pnp_detection --method=2

解释

这里详细解释了实时应用程序的代码

  1. 读取3D纹理对象模型和对象网格。

    为了加载纹理模型,我实现了Model类,该类具有*load()*函数,用于打开YAML文件并获取存储的3D点及其对应的描述符。您可以在`samples/cpp/tutorial_code/calib3d/real_time_pose_estimation/Data/cookies_ORB.yml`中找到3D纹理模型的示例。

    /* Load a YAML file using OpenCV */
    void Model::load(const std::string path)
    {
    cv::Mat points3d_mat;
    storage["points_3d"] >> points3d_mat;
    storage["descriptors"] >> descriptors_;
    points3d_mat.copyTo(list_points3d_in_);
    storage.release();
    }
    用于写入或读取所有必要信息的XML/YAML/JSON文件存储类...
    定义 persistence.hpp:261
    @ READ
    值,打开文件进行读取
    定义 persistence.hpp:266
    n 维密集数组类
    定义 mat.hpp:830
    void copyTo(OutputArray m) const
    将矩阵复制到另一个矩阵。

    在主程序中,模型加载如下

    Model model; // instantiate Model object
    model.load(yml_read_path); // load a 3D textured object model

    为了读取模型网格,我实现了一个Mesh类,该类具有*load()*函数,用于打开\(*\).ply文件并存储对象的3D点以及组成的三角形。您可以在`samples/cpp/tutorial_code/calib3d/real_time_pose_estimation/Data/box.ply`中找到模型网格的示例。

    /* Load a CSV with *.ply format */
    void Mesh::load(const std::string path)
    {
    // Create the reader
    CsvReader csvReader(path);
    // Clear previous data
    list_vertex_.clear();
    list_triangles_.clear();
    // Read from .ply file
    csvReader.readPLY(list_vertex_, list_triangles_);
    // Update mesh attributes
    num_vertexs_ = list_vertex_.size();
    num_triangles_ = list_triangles_.size();
    }

    在主程序中,网格加载如下

    Mesh mesh; // instantiate Mesh object
    mesh.load(ply_read_path); // load an object mesh

    您也可以加载不同的模型和网格

    ./cpp-tutorial-pnp_detection --mesh=/absolute_path_to_your_mesh.ply --model=/absolute_path_to_your_model.yml
  2. 从相机或视频获取输入

    为了进行检测,需要捕获视频。通过传递视频在您机器上的绝对路径来加载录制的视频。为了测试该应用程序,您可以在`samples/cpp/tutorial_code/calib3d/real_time_pose_estimation/Data/box.mp4`中找到一个录制的视频。

    cv::VideoCapture cap; // instantiate VideoCapture
    cap.open(video_read_path); // open a recorded video
    if(!cap.isOpened()) // check if we succeeded
    {
    std::cout << "Could not open the camera device" << std::endl;
    return -1;
    }
    用于从视频文件、图像序列或相机捕获视频的类。
    Definition videoio.hpp:772
    virtual bool open(const String &filename, int apiPreference=CAP_ANY)
    打开一个视频文件、捕获设备或IP视频流用于视频捕获。
    virtual bool isOpened() const
    如果视频捕获已初始化,则返回 true。

    然后算法逐帧计算

    cv::Mat frame, frame_vis;
    while(cap.read(frame) && cv::waitKey(30) != 27) // capture frame until ESC is pressed
    {
    frame_vis = frame.clone(); // refresh visualisation frame
    // MAIN ALGORITHM
    }
    CV_NODISCARD_STD Mat clone() const
    创建数组及其底层数据的完整副本。
    virtual bool read(OutputArray image)
    抓取、解码并返回下一个视频帧。
    int waitKey(int delay=0)
    等待按键按下。

    您也可以加载不同的录制视频

    ./cpp-tutorial-pnp_detection --video=/absolute_path_to_your_video.mp4
  3. 从场景中提取ORB特征和描述符

    下一步是检测场景特征并提取其描述符。为此,我实现了一个RobustMatcher类,它具有用于关键点检测和特征提取的函数。您可以在`samples/cpp/tutorial_code/calib3d/real_time_pose_estimation/src/RobusMatcher.cpp`中找到它。在您的*RobusMatch*对象中,您可以使用OpenCV的任何2D特征检测器。在这种情况下,我使用了cv::ORB特征,因为它基于cv::FAST来检测关键点,并使用cv::xfeatures2d::BriefDescriptorExtractor来提取描述符,这意味着它快速且对旋转具有鲁棒性。您可以在文档中找到有关*ORB*的更详细信息。

    以下代码是如何实例化和设置特征检测器和描述符提取器

    RobustMatcher rmatcher; // instantiate RobustMatcher
    cv::FeatureDetector * detector = new cv::OrbFeatureDetector(numKeyPoints); // instantiate ORB feature detector
    cv::DescriptorExtractor * extractor = new cv::OrbDescriptorExtractor(); // instantiate ORB descriptor extractor
    rmatcher.setFeatureDetector(detector); // set feature detector
    rmatcher.setDescriptorExtractor(extractor); // set descriptor extractor
    2D图像特征检测器和描述符提取器的抽象基类。
    定义 features2d.hpp:139

    特征和描述符将由匹配函数内部的*RobustMatcher*计算。

  4. 使用Flann匹配器将场景描述符与模型描述符进行匹配

    这是我们检测算法的第一步。主要思想是将场景描述符与我们的模型描述符进行匹配,以便了解当前场景中找到特征的3D坐标。

    首先,我们必须设置要使用的匹配器。在这种情况下,使用了cv::FlannBasedMatcher匹配器,就计算成本而言,随着训练特征集合的增加,它比cv::BFMatcher匹配器更快。然后,对于FlannBased匹配器,由于*ORB*描述符是二进制的,所创建的索引是*Multi-Probe LSH: Efficient Indexing for High-Dimensional Similarity Search*。

    您可以调整*LSH*和搜索参数以提高匹配效率

    cv::Ptr<cv::flann::IndexParams> indexParams = cv::makePtr<cv::flann::LshIndexParams>(6, 12, 1); // instantiate LSH index parameters
    cv::Ptr<cv::flann::SearchParams> searchParams = cv::makePtr<cv::flann::SearchParams>(50); // instantiate flann search parameters
    cv::DescriptorMatcher * matcher = new cv::FlannBasedMatcher(indexParams, searchParams); // instantiate FlannBased matcher
    rmatcher.setDescriptorMatcher(matcher); // set matcher
    用于匹配关键点描述符的抽象基类。
    定义 features2d.hpp:995
    基于 Flann 的描述符匹配器。
    定义 features2d.hpp:1294
    std::shared_ptr< _Tp > Ptr
    Definition cvstd_wrapper.hpp:23
    static Ptr< _Tp > makePtr(const A1 &... a1)
    定义 cvstd_wrapper.hpp:26

    其次,我们必须通过使用*robustMatch()*或*fastRobustMatch()*函数来调用匹配器。使用这两个函数的区别在于它们的计算成本。第一种方法较慢,但在过滤良好匹配时更鲁棒,因为它使用两次比率测试和一次对称性测试。相比之下,第二种方法更快,但鲁棒性较低,因为它只对匹配项应用一次比率测试。

    以下代码用于获取模型的3D点及其描述符,然后在主程序中调用匹配器

    // Get the MODEL INFO
    std::vector<cv::Point3f> list_points3d_model = model.get_points3d(); // list with model 3D coordinates
    cv::Mat descriptors_model = model.get_descriptors(); // list with descriptors of each 3D coordinate
    // -- Step 1: Robust matching between model descriptors and scene descriptors
    std::vector<cv::DMatch> good_matches; // to obtain the model 3D points in the scene
    std::vector<cv::KeyPoint> keypoints_scene; // to obtain the 2D points of the scene
    if(fast_match)
    {
    rmatcher.fastRobustMatch(frame, good_matches, keypoints_scene, descriptors_model);
    }
    else
    {
    rmatcher.robustMatch(frame, good_matches, keypoints_scene, descriptors_model);
    }

    以下代码对应于*RobustMatcher*类中的*robustMatch()*函数。此函数使用给定图像检测关键点并提取描述符,然后使用*两最近邻*(two Nearest Neighbour)方法将提取的描述符与给定模型描述符进行匹配,反之亦然。之后,对两个方向的匹配项应用比率测试,以移除第一和第二最佳匹配之间距离比大于给定阈值的匹配项。最后,应用对称性测试以移除非对称匹配项。

    void RobustMatcher::robustMatch( const cv::Mat& frame, std::vector<cv::DMatch>& good_matches,
    std::vector<cv::KeyPoint>& keypoints_frame,
    const std::vector<cv::KeyPoint>& keypoints_model, const cv::Mat& descriptors_model )
    {
    // 1a. Detection of the ORB features
    this->computeKeyPoints(frame, keypoints_frame);
    // 1b. Extraction of the ORB descriptors
    cv::Mat descriptors_frame;
    this->computeDescriptors(frame, keypoints_frame, descriptors_frame);
    // 2. Match the two image descriptors
    std::vector<std::vector<cv::DMatch> > matches12, matches21;
    // 2a. From image 1 to image 2
    matcher_->knnMatch(descriptors_frame, descriptors_model, matches12, 2); // return 2 nearest neighbours
    // 2b. From image 2 to image 1
    matcher_->knnMatch(descriptors_model, descriptors_frame, matches21, 2); // return 2 nearest neighbours
    // 3. Remove matches for which NN ratio is > than threshold
    // clean image 1 -> image 2 matches
    int removed1 = ratioTest(matches12);
    // clean image 2 -> image 1 matches
    int removed2 = ratioTest(matches21);
    // 4. Remove non-symmetrical matches
    symmetryTest(matches12, matches21, good_matches);
    }

    在匹配过滤之后,我们必须使用获得的*DMatches*向量,从找到的场景关键点和我们的3D模型中提取2D和3D对应关系。有关cv::DMatch的更多信息,请查阅文档。

    // -- Step 2: Find out the 2D/3D correspondences
    std::vector<cv::Point3f> list_points3d_model_match; // container for the model 3D coordinates found in the scene
    std::vector<cv::Point2f> list_points2d_scene_match; // container for the model 2D coordinates found in the scene
    for(unsigned int match_index = 0; match_index < good_matches.size(); ++match_index)
    {
    cv::Point3f point3d_model = list_points3d_model[ good_matches[match_index].trainIdx ]; // 3D point from model
    cv::Point2f point2d_scene = keypoints_scene[ good_matches[match_index].queryIdx ].pt; // 2D point from the scene
    list_points3d_model_match.push_back(point3d_model); // add 3D point
    list_points2d_scene_match.push_back(point2d_scene); // add 2D point
    }
    用于指定其x、y和z坐标的3D点模板类。
    定义 types.hpp:255

    您还可以更改比率测试阈值、要检测的关键点数量以及是否使用鲁棒匹配器

    ./cpp-tutorial-pnp_detection --ratio=0.8 --keypoints=1000 --fast=false
  5. 使用PnP + Ransac进行姿态估计

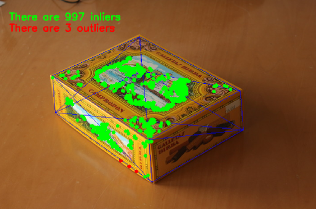
    一旦有了2D和3D对应关系,我们必须应用PnP算法来估计相机姿态。我们必须使用cv::solvePnPRansac而不是cv::solvePnP的原因是,匹配后并非所有找到的对应关系都是正确的,很可能存在错误的对应关系,也称为*离群点*(outliers)。随机抽样一致性(Random Sample Consensus)或*Ransac*是一种非确定性迭代方法,它从观测数据中估计数学模型的参数,随着迭代次数的增加产生近似结果。应用*Ransac*后,所有*离群点*将被消除,然后以一定的概率估计相机姿态以获得良好解决方案。

    为了进行相机姿态估计,我实现了一个PnPProblem类。这个类有4个属性:给定的标定矩阵、旋转矩阵、平移矩阵以及旋转-平移矩阵。用于估计姿态的相机的内参是必需的。要获取这些参数,您可以查阅使用方形棋盘格进行相机标定OpenCV相机标定教程。

    以下代码是如何在主程序中声明*PnPProblem类*

    // Intrinsic camera parameters: UVC WEBCAM
    double f = 55; // focal length in mm
    double sx = 22.3, sy = 14.9; // sensor size
    double width = 640, height = 480; // image size
    double params_WEBCAM[] = { width*f/sx, // fx
    height*f/sy, // fy
    width/2, // cx
    height/2}; // cy
    PnPProblem pnp_detection(params_WEBCAM); // instantiate PnPProblem class

    以下代码是*PnPProblem类*如何初始化其属性的

    // Custom constructor given the intrinsic camera parameters
    PnPProblem::PnPProblem(const double params[])
    {
    _A_matrix = cv::Mat::zeros(3, 3, CV_64FC1); // intrinsic camera parameters
    _A_matrix.at<double>(0, 0) = params[0]; // [ fx 0 cx ]
    _A_matrix.at<double>(1, 1) = params[1]; // [ 0 fy cy ]
    _A_matrix.at<double>(0, 2) = params[2]; // [ 0 0 1 ]
    _A_matrix.at<double>(1, 2) = params[3];
    _A_matrix.at<double>(2, 2) = 1;
    _R_matrix = cv::Mat::zeros(3, 3, CV_64FC1); // rotation matrix
    _t_matrix = cv::Mat::zeros(3, 1, CV_64FC1); // translation matrix
    _P_matrix = cv::Mat::zeros(3, 4, CV_64FC1); // rotation-translation matrix
    }
    static CV_NODISCARD_STD MatExpr zeros(int rows, int cols, int type)
    返回指定大小和类型的全零数组。
    #define CV_64FC1
    定义 interface.h:124

    OpenCV提供了四种PnP方法:ITERATIVE、EPNP、P3P和DLS。根据应用程序类型,估计方法会有所不同。如果我们想制作一个实时应用程序,EPNP和P3P是更合适的方法,因为它们在寻找最优解方面比ITERATIVE和DLS更快。然而,EPNP和P3P在面对平面时鲁棒性不强,有时姿态估计似乎有镜像效果。因此,在本教程中,由于待检测对象具有平面,使用了ITERATIVE方法。

    OpenCV的RANSAC实现要求您提供三个参数:1) 算法停止前的最大迭代次数,2) 观测点和计算点投影之间允许的最大距离(以便将其视为内点),以及3) 获得良好结果的置信度。您可以调整这些参数以提高算法性能。增加迭代次数将获得更精确的解决方案,但会花费更多时间来找到解决方案。增加重投影误差将减少计算时间,但您的解决方案会不准确。降低置信度会使您的算法更快,但获得的解决方案会不准确。

    以下参数适用于此应用程序

    // RANSAC parameters
    int iterationsCount = 500; // number of Ransac iterations.
    float reprojectionError = 2.0; // maximum allowed distance to consider it an inlier.
    float confidence = 0.95; // RANSAC successful confidence.

    以下代码对应于*PnPProblem类*中的*estimatePoseRANSAC()*函数。此函数根据一组2D/3D对应关系、要使用的PnP方法、输出内点容器和Ransac参数来估计旋转和平移矩阵。

    // Estimate the pose given a list of 2D/3D correspondences with RANSAC and the method to use
    void PnPProblem::estimatePoseRANSAC( const std::vector<cv::Point3f> &list_points3d, // list with model 3D coordinates
    const std::vector<cv::Point2f> &list_points2d, // list with scene 2D coordinates
    int flags, cv::Mat &inliers, int iterationsCount, // PnP method; inliers container
    float reprojectionError, float confidence ) // RANSAC parameters
    {
    cv::Mat distCoeffs = cv::Mat::zeros(4, 1, CV_64FC1); // vector of distortion coefficients
    cv::Mat rvec = cv::Mat::zeros(3, 1, CV_64FC1); // output rotation vector
    cv::Mat tvec = cv::Mat::zeros(3, 1, CV_64FC1); // output translation vector
    bool useExtrinsicGuess = false; // if true the function uses the provided rvec and tvec values as
    // initial approximations of the rotation and translation vectors
    cv::solvePnPRansac( list_points3d, list_points2d, _A_matrix, distCoeffs, rvec, tvec,
    useExtrinsicGuess, iterationsCount, reprojectionError, confidence,
    inliers, flags );
    Rodrigues(rvec,_R_matrix); // 将旋转向量转换为矩阵
    _t_matrix = tvec; // 设置平移矩阵
    this->set_P_matrix(_R_matrix, _t_matrix); // 设置旋转-平移矩阵
    }
    bool solvePnPRansac(InputArray objectPoints, InputArray imagePoints, InputArray cameraMatrix, InputArray distCoeffs, OutputArray rvec, OutputArray tvec, bool useExtrinsicGuess=false, int iterationsCount=100, float reprojectionError=8.0, double confidence=0.99, OutputArray inliers=noArray(), int flags=SOLVEPNP_ITERATIVE)
    使用RANSAC方案从3D-2D点对应关系中查找对象姿态,以处理不良匹配...

    以下代码是主算法的第3步和第4步。第一步是调用上述函数,第二步是从RANSAC中获取输出的内点向量,以获得用于绘制的2D场景点。如代码所示,如果存在匹配项,我们必须确保应用RANSAC,否则,cv::solvePnPRansac函数可能会因为OpenCV的某个*bug*而崩溃。

    if(good_matches.size() > 0) // None matches, then RANSAC crashes
    {
    // -- Step 3: Estimate the pose using RANSAC approach
    pnp_detection.estimatePoseRANSAC( list_points3d_model_match, list_points2d_scene_match,
    pnpMethod, inliers_idx, iterationsCount, reprojectionError, confidence );
    // -- Step 4: Catch the inliers keypoints to draw
    for(int inliers_index = 0; inliers_index < inliers_idx.rows; ++inliers_index)
    {
    int n = inliers_idx.at<int>(inliers_index); // i-inlier
    cv::Point2f point2d = list_points2d_scene_match[n]; // i-inlier point 2D
    list_points2d_inliers.push_back(point2d); // add i-inlier to list
    }

    最后,一旦相机姿态被估计,我们就可以使用\(R\)和\(t\)来计算在世界参考系中表示的给定3D点在图像上的2D投影,使用*理论*部分所示的公式。

    以下代码对应于*PnPProblem类*中的*backproject3DPoint()*函数。该函数将世界参考系中表示的给定3D点反向投影到2D图像上。

    // Backproject a 3D point to 2D using the estimated pose parameters
    cv::Point2f PnPProblem::backproject3DPoint(const cv::Point3f &point3d)
    {
    // 3D point vector [x y z 1]'
    cv::Mat point3d_vec = cv::Mat(4, 1, CV_64FC1);
    point3d_vec.at<double>(0) = point3d.x;
    point3d_vec.at<double>(1) = point3d.y;
    point3d_vec.at<double>(2) = point3d.z;
    point3d_vec.at<double>(3) = 1;
    // 2D point vector [u v 1]'
    cv::Mat point2d_vec = cv::Mat(4, 1, CV_64FC1);
    point2d_vec = _A_matrix * _P_matrix * point3d_vec;
    // Normalization of [u v]'
    cv::Point2f point2d;
    point2d.x = point2d_vec.at<double>(0) / point2d_vec.at<double>(2);
    point2d.y = point2d_vec.at<double>(1) / point2d_vec.at<double>(2);
    return point2d;
    }
    _Tp & at(int i0=0)
    返回指定数组元素的引用。
    _Tp x
    3D 点的 x 坐标
    定义 types.hpp:284
    _Tp y
    点的 y 坐标
    定义 types.hpp:202
    _Tp x
    点的 x 坐标
    定义 types.hpp:201

    上述函数用于计算对象*网格*的所有3D点,以显示对象的姿态。

    您还可以更改RANSAC参数和PnP方法

    ./cpp-tutorial-pnp_detection --error=0.25 --confidence=0.90 --iterations=250 --method=3
  6. 线性卡尔曼滤波(Kalman Filter)用于不良姿态的剔除

    在计算机视觉或机器人领域,应用检测或跟踪技术后,由于一些传感器错误而获得不良结果是很常见的。为了避免这些不良检测,本教程解释了如何实现线性卡尔曼滤波(Linear Kalman Filter)。卡尔曼滤波将在检测到给定数量的内点后应用。

    您可以找到更多关于卡尔曼滤波的信息。在本教程中,使用了OpenCV中基于用于位置和方向跟踪的线性卡尔曼滤波cv::KalmanFilter实现来设置动态和测量模型。

    首先,我们必须定义我们的状态向量,它将有18个状态:位置数据(x,y,z)及其一阶和二阶导数(速度和加速度),然后以三个欧拉角(roll, pitch, yaw)的形式添加旋转,以及它们的一阶和二阶导数(角速度和角加速度)。

    \[X = (x,y,z,\dot x,\dot y,\dot z,\ddot x,\ddot y,\ddot z,\psi,\theta,\phi,\dot \psi,\dot \theta,\dot \phi,\ddot \psi,\ddot \theta,\ddot \phi)^T\]

    其次,我们必须定义测量值的数量,这将是6个:从\(R\)和\(t\)中我们可以提取\((x,y,z)\)和\((\psi,\theta,\phi)\)。此外,我们必须定义施加到系统的控制动作的数量,在这种情况下将是*零*。最后,我们必须定义测量之间的微分时间,在这种情况下是\(1/T\),其中*T*是视频的帧率。

    cv::KalmanFilter KF; // instantiate Kalman Filter
    int nStates = 18; // the number of states
    int nMeasurements = 6; // the number of measured states
    int nInputs = 0; // the number of action control
    double dt = 0.125; // time between measurements (1/FPS)
    initKalmanFilter(KF, nStates, nMeasurements, nInputs, dt); // init function
    卡尔曼滤波器类。
    Definition tracking.hpp:364

    以下代码对应于*卡尔曼滤波*的初始化。首先,设置过程噪声、测量噪声和误差协方差矩阵。其次,设置作为动态模型的转换矩阵,最后是作为测量模型的测量矩阵。

    您可以调整过程噪声和测量噪声以提高*卡尔曼滤波*的性能。当测量噪声减小时,算法收敛速度会更快,但在面对不良测量时会变得敏感。

    void initKalmanFilter(cv::KalmanFilter &KF, int nStates, int nMeasurements, int nInputs, double dt)
    {
    KF.init(nStates, nMeasurements, nInputs, CV_64F); // init Kalman Filter
    cv::setIdentity(KF.processNoiseCov, cv::Scalar::all(1e-5)); // set process noise
    cv::setIdentity(KF.measurementNoiseCov, cv::Scalar::all(1e-4)); // set measurement noise
    cv::setIdentity(KF.errorCovPost, cv::Scalar::all(1)); // error covariance
    /* DYNAMIC MODEL */
    // [1 0 0 dt 0 0 dt2 0 0 0 0 0 0 0 0 0 0 0]
    // [0 1 0 0 dt 0 0 dt2 0 0 0 0 0 0 0 0 0 0]
    // [0 0 1 0 0 dt 0 0 dt2 0 0 0 0 0 0 0 0 0]
    // [0 0 0 1 0 0 dt 0 0 0 0 0 0 0 0 0 0 0]
    // [0 0 0 0 1 0 0 dt 0 0 0 0 0 0 0 0 0 0]
    // [0 0 0 0 0 1 0 0 dt 0 0 0 0 0 0 0 0 0]
    // [0 0 0 0 0 0 1 0 0 0 0 0 0 0 0 0 0 0]
    // [0 0 0 0 0 0 0 1 0 0 0 0 0 0 0 0 0 0]
    // [0 0 0 0 0 0 0 0 1 0 0 0 0 0 0 0 0 0]
    // [0 0 0 0 0 0 0 0 0 1 0 0 dt 0 0 dt2 0 0]
    // [0 0 0 0 0 0 0 0 0 0 1 0 0 dt 0 0 dt2 0]
    // [0 0 0 0 0 0 0 0 0 0 0 1 0 0 dt 0 0 dt2]
    // [0 0 0 0 0 0 0 0 0 0 0 0 1 0 0 dt 0 0]
    // [0 0 0 0 0 0 0 0 0 0 0 0 0 1 0 0 dt 0]
    // [0 0 0 0 0 0 0 0 0 0 0 0 0 0 1 0 0 dt]
    // [0 0 0 0 0 0 0 0 0 0 0 0 0 0 0 1 0 0]
    // [0 0 0 0 0 0 0 0 0 0 0 0 0 0 0 0 1 0]
    // [0 0 0 0 0 0 0 0 0 0 0 0 0 0 0 0 0 1]
    // position
    KF.transitionMatrix.at<double>(0,3) = dt;
    KF.transitionMatrix.at<double>(1,4) = dt;
    KF.transitionMatrix.at<double>(2,5) = dt;
    KF.transitionMatrix.at<double>(3,6) = dt;
    KF.transitionMatrix.at<double>(4,7) = dt;
    KF.transitionMatrix.at<double>(5,8) = dt;
    KF.transitionMatrix.at<double>(0,6) = 0.5*pow(dt,2);
    KF.transitionMatrix.at<double>(1,7) = 0.5*pow(dt,2);
    KF.transitionMatrix.at<double>(2,8) = 0.5*pow(dt,2);
    // orientation
    KF.transitionMatrix.at<double>(9,12) = dt;
    KF.transitionMatrix.at<double>(10,13) = dt;
    KF.transitionMatrix.at<double>(11,14) = dt;
    KF.transitionMatrix.at<double>(12,15) = dt;
    KF.transitionMatrix.at<double>(13,16) = dt;
    KF.transitionMatrix.at<double>(14,17) = dt;
    KF.transitionMatrix.at<double>(9,15) = 0.5*pow(dt,2);
    KF.transitionMatrix.at<double>(10,16) = 0.5*pow(dt,2);
    KF.transitionMatrix.at<double>(11,17) = 0.5*pow(dt,2);
    /* MEASUREMENT MODEL */
    // [1 0 0 0 0 0 0 0 0 0 0 0 0 0 0 0 0 0]
    // [0 1 0 0 0 0 0 0 0 0 0 0 0 0 0 0 0 0]
    // [0 0 1 0 0 0 0 0 0 0 0 0 0 0 0 0 0 0]
    // [0 0 0 0 0 0 0 0 0 1 0 0 0 0 0 0 0 0]
    // [0 0 0 0 0 0 0 0 0 0 1 0 0 0 0 0 0 0]
    // [0 0 0 0 0 0 0 0 0 0 0 1 0 0 0 0 0 0]
    KF.measurementMatrix.at<double>(0,0) = 1; // x
    KF.measurementMatrix.at<double>(1,1) = 1; // y
    KF.measurementMatrix.at<double>(2,2) = 1; // z
    KF.measurementMatrix.at<double>(3,9) = 1; // roll
    KF.measurementMatrix.at<double>(4,10) = 1; // pitch
    KF.measurementMatrix.at<double>(5,11) = 1; // yaw
    }
    Mat transitionMatrix
    状态转移矩阵 (A)
    定义 tracking.hpp:398
    Mat measurementMatrix
    测量矩阵 (H)
    定义 tracking.hpp:400
    Mat errorCovPost
    后验误差估计协方差矩阵 (P(k)): P(k)=(I-K(k)*H)*P'(k)
    定义 tracking.hpp:405
    void init(int dynamParams, int measureParams, int controlParams=0, int type=CV_32F)
    重新初始化卡尔曼滤波器。之前的内容将被销毁。
    Mat measurementNoiseCov
    测量噪声协方差矩阵 (R)
    定义 tracking.hpp:402
    Mat processNoiseCov
    过程噪声协方差矩阵 (Q)
    定义 tracking.hpp:401
    static Scalar_< double > all(double v0)
    void setIdentity(InputOutputArray mtx, const Scalar &s=Scalar(1))
    初始化一个缩放的单位矩阵。
    #define CV_64F
    Definition interface.h:79

    以下代码是主算法的第5步。当*Ransac*后获得的内点数超过阈值时,测量矩阵被填充,然后*卡尔曼滤波*被更新。

    // -- Step 5: Kalman Filter
    // GOOD MEASUREMENT
    if( inliers_idx.rows >= minInliersKalman )
    {
    // Get the measured translation
    cv::Mat translation_measured(3, 1, CV_64F);
    translation_measured = pnp_detection.get_t_matrix();
    // Get the measured rotation
    cv::Mat rotation_measured(3, 3, CV_64F);
    rotation_measured = pnp_detection.get_R_matrix();
    // fill the measurements vector
    fillMeasurements(measurements, translation_measured, rotation_measured);
    }
    // Instantiate estimated translation and rotation
    cv::Mat translation_estimated(3, 1, CV_64F);
    cv::Mat rotation_estimated(3, 3, CV_64F);
    // update the Kalman filter with good measurements
    updateKalmanFilter( KF, measurements,
    translation_estimated, rotation_estimated);

    以下代码对应于*fillMeasurements()*函数,该函数将测量的旋转矩阵转换为欧拉角,并用测量的平移向量填充测量矩阵。

    void fillMeasurements( cv::Mat &measurements,
    const cv::Mat &translation_measured, const cv::Mat &rotation_measured)
    {
    // Convert rotation matrix to euler angles
    cv::Mat measured_eulers(3, 1, CV_64F);
    measured_eulers = rot2euler(rotation_measured);
    // Set measurement to predict
    measurements.at<double>(0) = translation_measured.at<double>(0); // x
    measurements.at<double>(1) = translation_measured.at<double>(1); // y
    measurements.at<double>(2) = translation_measured.at<double>(2); // z
    measurements.at<double>(3) = measured_eulers.at<double>(0); // roll
    measurements.at<double>(4) = measured_eulers.at<double>(1); // pitch
    measurements.at<double>(5) = measured_eulers.at<double>(2); // yaw
    }

    以下代码对应于*updateKalmanFilter()*函数,该函数更新卡尔曼滤波并设置估计的旋转矩阵和平移向量。估计的旋转矩阵来自于估计的欧拉角到旋转矩阵的转换。

    void updateKalmanFilter( cv::KalmanFilter &KF, cv::Mat &measurement,
    cv::Mat &translation_estimated, cv::Mat &rotation_estimated )
    {
    // First predict, to update the internal statePre variable
    cv::Mat prediction = KF.predict();
    // The "correct" phase that is going to use the predicted value and our measurement
    cv::Mat estimated = KF.correct(measurement);
    // Estimated translation
    translation_estimated.at<double>(0) = estimated.at<double>(0);
    translation_estimated.at<double>(1) = estimated.at<double>(1);
    translation_estimated.at<double>(2) = estimated.at<double>(2);
    // Estimated euler angles
    cv::Mat eulers_estimated(3, 1, CV_64F);
    eulers_estimated.at<double>(0) = estimated.at<double>(9);
    eulers_estimated.at<double>(1) = estimated.at<double>(10);
    eulers_estimated.at<double>(2) = estimated.at<double>(11);
    // Convert estimated quaternion to rotation matrix
    rotation_estimated = euler2rot(eulers_estimated);
    }
    const Mat & correct(const Mat &measurement)
    从测量值更新预测状态。
    const Mat & predict(const Mat &control=Mat())
    计算预测状态。

    第6步是设置估计的旋转-平移矩阵

    // -- Step 6: Set estimated projection matrix
    pnp_detection_est.set_P_matrix(rotation_estimated, translation_estimated);

    最后的可选步骤是绘制找到的姿态。为此,我实现了一个函数来绘制所有网格的3D点和额外的参考轴。

    // -- Step X: Draw pose
    drawObjectMesh(frame_vis, &mesh, &pnp_detection, green); // draw current pose
    drawObjectMesh(frame_vis, &mesh, &pnp_detection_est, yellow); // draw estimated pose
    double l = 5;
    std::vector<cv::Point2f> pose_points2d;
    pose_points2d.push_back(pnp_detection_est.backproject3DPoint(cv::Point3f(0,0,0))); // axis center
    pose_points2d.push_back(pnp_detection_est.backproject3DPoint(cv::Point3f(l,0,0))); // axis x
    pose_points2d.push_back(pnp_detection_est.backproject3DPoint(cv::Point3f(0,l,0))); // axis y
    pose_points2d.push_back(pnp_detection_est.backproject3DPoint(cv::Point3f(0,0,l))); // axis z
    draw3DCoordinateAxes(frame_vis, pose_points2d); // draw axes

    您还可以修改更新卡尔曼滤波的最小内点数

    ./cpp-tutorial-pnp_detection --inliers=20

结果

以下视频是使用所解释的检测算法和以下参数进行实时姿态估计的结果

// 鲁棒匹配器参数
int numKeyPoints = 2000; // 检测到的关键点数量
float ratio = 0.70f; // 比率测试
bool fast_match = true; // fastRobustMatch() 或 robustMatch()
// RANSAC parameters
int iterationsCount = 500; // number of Ransac iterations.
int reprojectionError = 2.0; // 视为内点的最大允许距离。
float confidence = 0.95; // RANSAC成功置信度。
// 卡尔曼滤波参数
int minInliersKalman = 30; // 卡尔曼更新阈值

您可以在YouTube上观看实时姿态估计